-
What you need to know before you start
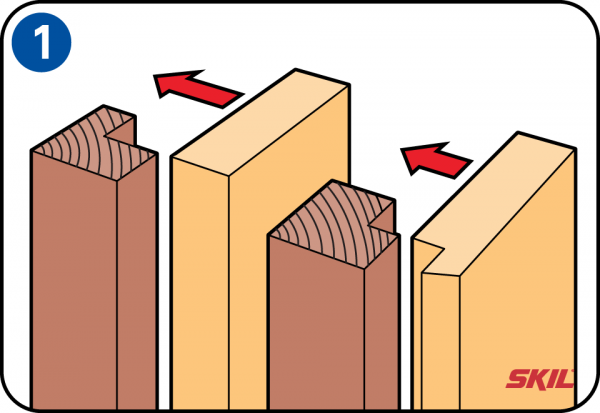
If you have a hollow door you can’t saw too much off the bottom. These doors are no more than a wooden frame with two hardboard sheets over it, and can’t be shortened by more than about 1 cm. If you have an MDF or laminated door you can remove slightly more than that. There are 2 kinds of interior doors: flush doors and overlapping doors. A flush door falls entirely into the door frame and is mounted on hinges. An overlapping door falls partly into the door frame with a lip that rests on the outside of the door frame. This type of door is mounted on a barrel hinge, which allows the door to be lifted out of the door frame.
-
Measuring
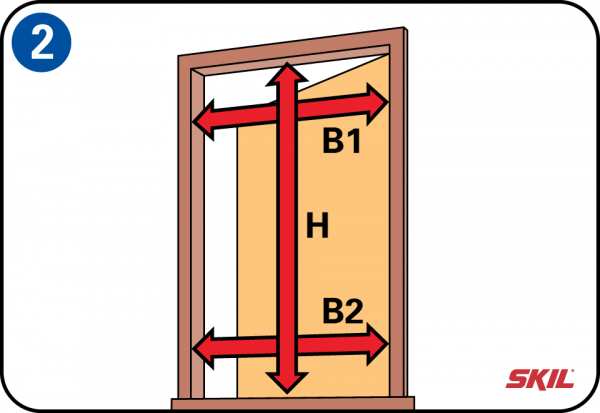
If you want to replace an old door you’ll first have to measure the size of the door opening. A carpenter’s ruler is easy to use and allows accurate measurement. First you measure the height and then the width at both the top and bottom of the frame. If there’s a difference in the width, take the largest size. Allow a gap of 2 mm at the top between the door and the frame. If you’re replacing the door it’s best to also replace the hinges at the same time.
-
Shortening the length
To allow the door to open and close freely, leave a gap of 4 to 8 mm at top and bottom. Mark off with a pencil how much needs to be removed at the bottom of the door. Then use a center punch to drive the pins out of the hinges. Of if you don’t have a punch you can use a large nail.
-
Straight line
Then use a try square to draw a straight line across the full width of the door at right angles to the vertical edges. Place the door on a sturdy workbench or trestles so that it is well supported. Plane or saw off the marked part at the bottom of the door and finish the edge smoothly with sandpaper. If you’re using a plane, hold the tool at an angle to the planing direction. The plane will then cut more easily.
-
Belt sander
If you’re using a belt sander you need to make allowance for the high speed of rotation, so work with care. Before you start check that the sanding belt is properly aligned – turn the tensioner knob until the belt runs perfectly straight over the baseplate. Move the machine evenly across the surface. The machine sands very rapidly, and if you’re not careful you can make uneven tracks in the wood. To sand a door it’s best to use a coarse sanding belt with a grit of 40.
-
Saw off a narrow strip
If you only need to remove a narrow strip, it’s a good idea to clamp a wooden plank to the underside of the door. That will make sawing a lot easier. Protect the bottom edge of the door against moisture with a coat of paint or varnish. Then you can hang the door on its hinges again.
-
Fitting the door to the right width
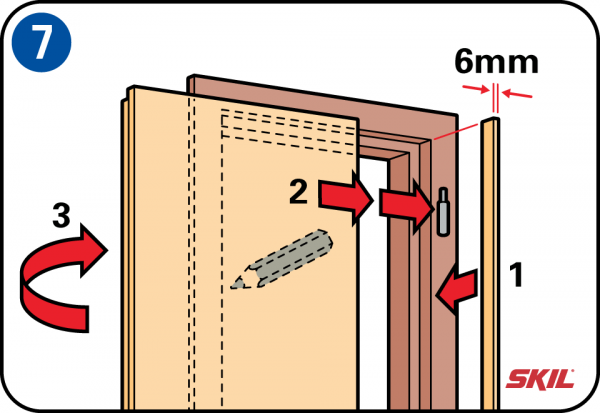
First check whether the door edge with the hinges is parallel to the frame. If it isn’t, you’ll first need to plane it to fit. To allow for the gap which the door needs so it can rotate freely in the frame, fit a 6 mm thick strip of wood inside the frame at the side with the hinges. Place the door against the strip. Then you can mark off the material to be removed at the closing edge of the door by drawing a line with a pencil along the door frame.
-
Finishing the door
Place the door on the trestles and saw along the line you’ve marked. If you have a door with a built-in window or several small windows, and if you need to remove more than 5 mm, you’ll need to saw off half the amount to be removed at each side, as otherwise the door will be asymmetrical. To allow the door to close smoothly you can if required plane off about 1.5 mm sloping downwards towards the inside of the door.