-
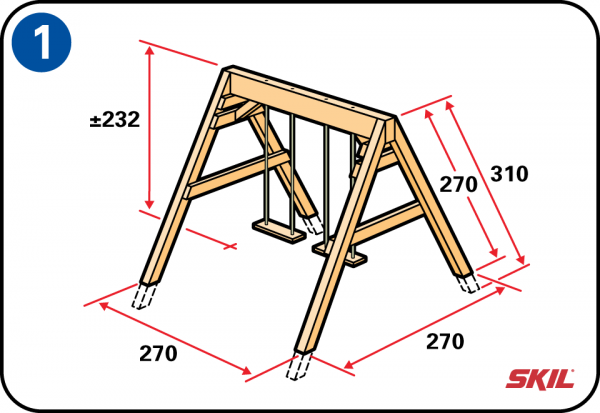
Dimensions of the swing
Build the swing with a height, width and depth of 270 cm. Don’t forget that the uprights need to have a total length of 310 cm, because they will be recessed into the ground by an extra 40 cm to ensure the swing is stable.
-
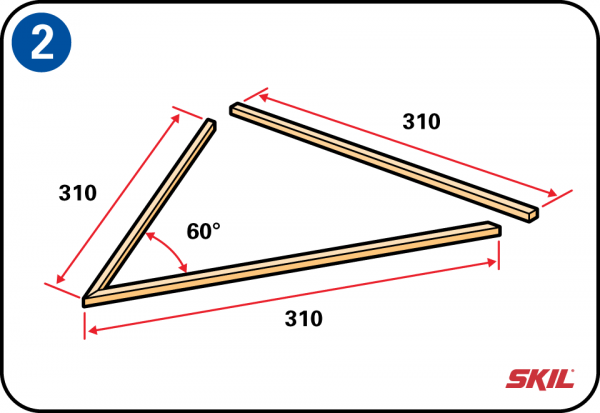
Uprights of the swing
We’ll start by positioning the 2 uprights, each with a length of 310 cm, on the left side at an angle of 60°. The two uprights, together with the width at the base which is also 310 cm, form the sides of an equilateral triangle (all three sides are the same length).
-
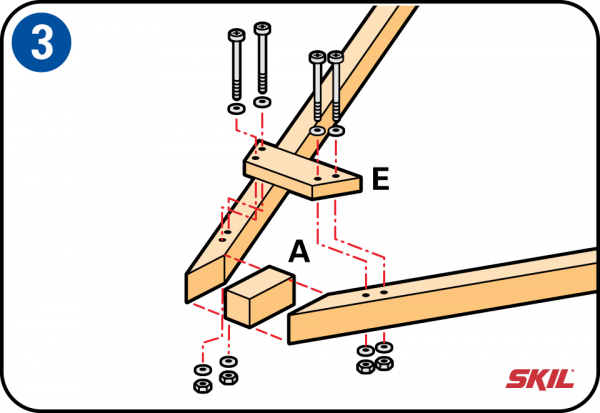
Assemble the uprights
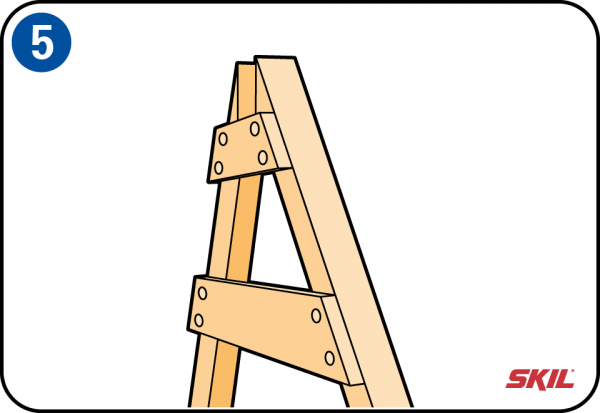
To allow us to assemble the uprights before we fit the top bar, we’ll make a spacer (A) with the same cross-section as the top bar. This spacer ensures that when we assemble the top bar, it fits precisely into the opening between the tops of the uprights.
Make the tops of the uprights fit neatly, saw the top ends off at an angle of 60°. Place the spacer between the uprights and fit the upper cross-piece in place. Saw the upper cross-piece (E) once you have positioned it so the top bar rests on it when you remove the spacer. Fix the cross-piece in place using four nuts and bolts, with washers between them. Secure each nut with an extra locknut, and tightened in the opposite direction to the nut.
-
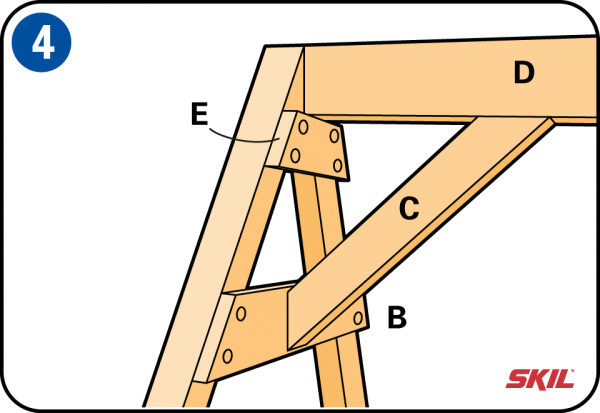
Fit the lower cross-piece
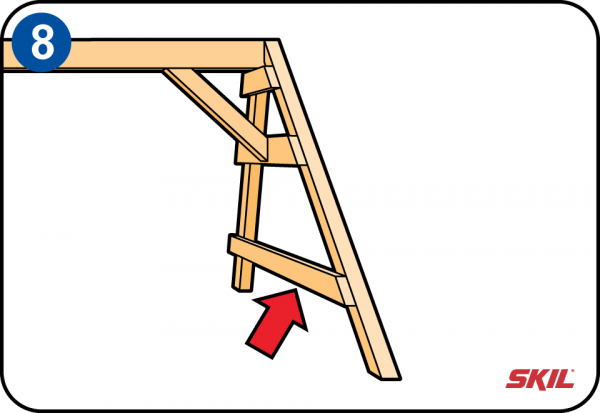
To prevent the swing from twisting and bending, we insert an extra (lower) cross-piece (B) with a width of 22 x 150 mm between the uprights. This will hold the diagonal support (C) in place, on which the top bar (D) will rest. We’ll make a supporting structure like this at both the left and right sides of the swing.
-
Fit the right upright together
Assemble the right upright with the upper and lower cross-pieces in the same way. This is a mirror image of the left upright, with the cross-pieces on the inner side of the swing.
-
Fit the top bar
Fit the top bar into the openings at the tops of the uprights, and drill holes through the top bar and the upper cross-piece. The cross-pieces are fitted on the inside of the swing. Fix the top bar to the uprights together with nuts, bolt and washers. Finally, fit the extra locknuts and tightened in the opposite direction to the nuts. Do the same on the right side of the swing.
-
Fit the diagonal support
Take a 150 x 22 mm plank with at a length of about 60 cm and saw each end off at an angle of 45°. Then fit the two diagonal supports under the top bar at both the left and right sides, and secure the top bar in place with nuts, bolts and washers.
-
Fit the stabilising planks of the swing
To give the uprights extra stability, we’ll fit a stabilising plank to the two uprights at each side. Here again we can use planks measuring 150 x 22 mm.
-
Dig the swing uprights into the ground
For safety, you have to dig the swing uprights into the ground. Before you do this, screw a number of bolts into the bottom of each upright, so the uprights are firmly anchored after filling the holes with concrete mix.
Use a narrow spade or a post-hole digger to make a narrow hole with a depth of about 40 cm. You can fix the uprights in place with concrete mix, made of 1 kg of coarse sand, 1 kg of gravel and 0,5 kg of cement. You can also use quick-drying mortar mix – tip this into the hole directly from the bag and pour some water over it.
-
Check that the uprights are properly aligned
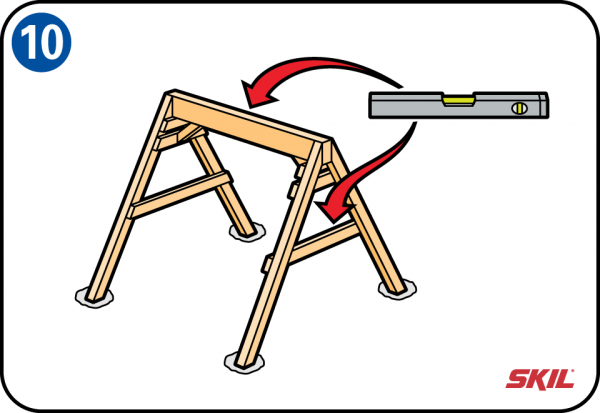
When you’re pouring the concrete mix, make sure the uprights of the swing are properly aligned. Use a spirit level to check that the top bar and the stabilising planks are horizontal and that, together with the uprights, they are properly aligned and parallel with each other. Finally, stamp the ground around the four uprights firmly in place.
-
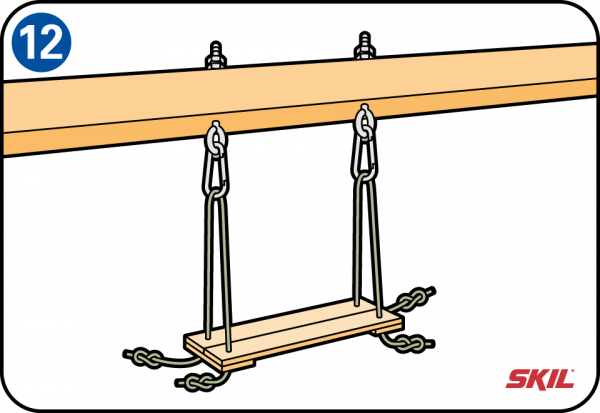
Swing supporting bolts
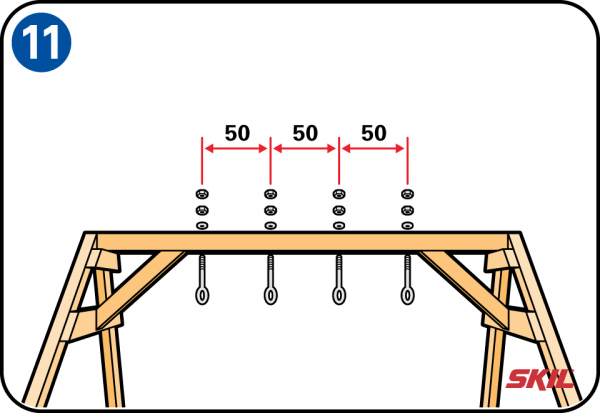
Fit the eye bolts to support the swings to the top bar, evenly spaced from the middle of the top bar with gaps of about 50 cm between them. Drill the holes for the four eye bolts. Secure the bolts with nuts, bolts and washers, and fit extra locknuts, tightening these in the opposite direction to the nuts. Fit the eye bolts in line and tighten them using a screwdriver through the eyes of the bolts.
-
Wooden swing seat
Use two planks (125 x 22 mm) with a length of 450 mm for each seat of the swing. Fit these together using similar planks with a length of 250 mm across and underneath the ends of the seats. That gives us seats measuring 250 x 450 mm. Drill four holes through the seats for the supporting ropes. Pass the ropes in a big loop through the snap hooks and through the holes in the seats, and tie four strong knots under the seats. Make sure the knots are big enough to support the weight of the seats and their occupants. The snap hooks make the ropes easy to fit and to remove later if necessary.
-
Step tip
You can also use special swing hooks to support the swing. Either way, remember to check the construction frequently and replace the eye bolts or hooks when necessary.